I know this is totally opposite to what most owners do to their WRRs but I love how civilised the bike is and would like to get mine fully back to standard.
When I bought it, it had an FMF exhaust on it and most of the emissions kit removed as far as I can tell. It spluttered a bit from cold plus the exhaust was too loud for my taste so the FMF was sold back along to fund the purchase of a standard exhaust complete with EXUP (?) flap and cables. That has now been fitted and cold running is already improved but I am struggling to see what other mods had been done.
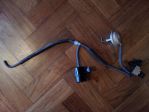
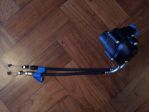
Quiet here at the moment so I have taken the seat off and can see that I am missing a black cylinder and pipe, the "flapper" and its solenoid with pipe. I have attached a photo I found on the web and have indicated the missing parts with a green arrow.
By any remote chance has anyone here removed these items, still have them, and are willing to sell them to me?
Merry Christmas to both you and Trish. Hope i find you well.
I've been enjoying great times out with the TRF since you suggested jumping on board earlier in the year, and i'm sure i can return the favour by helping you out with your return to stock project.
When i got hold of my bike, it only had about 334 miles on it and was in totally stock condition. As you well know by now, i decided to unleash the beast within and have no doubt removed everything that your looking for. It's the sort of stuff i have filling up the small amount of storage space i have for many years and then never end up using again.
Give me a few days as i'm away a lot at the mo, but i'll pull out everything that i've got, photograph it all and then give you a hand in discovering what you seem to be still missing. Sounds like you're half way there already. While i'm doing that, check if your air box flapper isn't just simply stuck down with a double sided sticky pad. The "solenoid with pipe" that you point to, is what then attaches to the flapper if i remember correctly.... i'm sure you probably know exactly how it all works . I'm certain i have everything you need anyway.
Don't worry about any cash. Just regard it a thanks for all the help you've given me over the last couple of years bud.
Promise i'll shout back with those photos real soon.
I decided to leave my bike as standard when I bought it. I often wondered whether that was the right decision. It's nice to hear that that's where Brian wants to get to. My bike runs smoothly all the time. It's never missed a single beat. Even high up in the Pyrenees mountains it fuelled perfectly. Unlike my dr350 on a previous trip which was definitely wheezing. The joys of fuel injection.
That sounds great Paul - a lovely after-Christmas present
Very many thanks!
My reasoning is that Mr Yamaha spends a fortune on research and doesn't put these extra parts on for no reason. I could be wrong but the fact that Steve's bog standard WRR runs so well seems to point to the fact that I am going in the right direction
If i remember correctly, the solenoid has a thin rod with a hooked end that catches onto the top of the flapper enabling it to be pulled up and down/ open or closed. I'm sure everything will come flooding back to me once i lay out all of the bits and pieces. I'll be onto this over the weekend for you buddy.
As a by the way, despite my bike being modded to hell, it runs smooth as butter and has never missed a beat. I have been into the clock and tweaked the CO settings though and believe this made all the difference in the bike feeling punchy and not bogging out
Speak again real soon and a very happy new year to you.
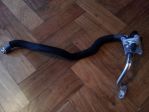
Fundamentally i think this is what you are after to begin with...
You'll notice that i was correct. The solenoid does indeed have a hooked rod that comes out of the underside which then catches onto the top of the flapper.
The long pipe then attaches to the throttle body underneath the fuel tank which i currently have an incredibly small rubber cap over to block it, as it is a vaccum (i will remove my fairing and fuel tank to take a photo if you need me to, to show you the location). You will need to remove that end cap and then attach the pipe. UNLESS, potentially the previous owner left the piping attached to the throttle body end and then just taped up the other end, that will now 'T' up to the rest of the piece i'm sending you. In which case, simply pull off the tape from the existing pipe you may have and 'T' it all up.
There should be a plug taped up somewhere on your bike and that will plug into the gadget at the far end of this rig being sent to you. To help matters, try watching this video as it helped me immensely. The sound quality isn't the best and the chap is from Singapore, but i promise if you watch it a few times, you'll be able to suss it out. Before you do, it is now maybe a good point to mention that when most of us do the air box flapper mod, we also remove the AIS. This video will show the two mods being done together and will highlight what else you might be missing. I will photograph the AIS parts next, but have one view of the video now to help give yourself a bit of background info. You'll just be doing the procedure in reverse....
https://www.youtube.com/watch?v=WFTOrxg_B6w
Next is the AIS...
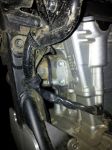
The left rubber pipe end attaches here at the air box where i have a 13mm rubber cap plugging up the hole (rubber plug is right in the middle of the photograph, slightly in front/ over the top of the rear shock)...
...Obviously remove the rubber cap and attach the pipe.
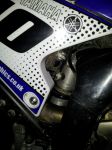
Then the metal pipe end attaches here at the head where you will find a blanking plate held in by two hex bolts (right in the middle of the photo next to the exhaust port)......
...Obviously remove the blanking plate and attach the metal pipe end. You'll find another taped up plug on your bike near the coolant bottle area that will need to be plugged into the socket on the AIS too. Slide the servo onto the tabs on the bike through the afixed rubber gromits.
I'd be very surprised if the air box flapper mod had been done and not the AIS removal Brian. Before i package up the air box flapper solenoid rig for posting to you, check if you require the AIS rig too.
Finally you mentioned that you'd put back the exup to the stock exhaust and so i'm guessing that you don't need this bit having probably already done it?.....
...and if already done, i'm sure that it is pluged into what was another taped up plug holding an exup simulator chip, now removed?
I hope i haven't waffled too much. Just let me know what you need: 1. Air box flapper solenoid rig
2. AIS rig
3. Exup rig
and i'll post it down to you in the week. If you've got any questions or need further photos of the throttle body area, or anything for that matter, just hola.
Wishing you a very happy and safe trip down to Murcia if i don't speak before.
Much sunshine,
Paul
-- Edited by Grassroots on Saturday 2nd of January 2016 07:24:15 PM
I appreciate your efforts and promise you none of them are wasted on me! The video was very helpful.
I have just one part of the airbox flapper assembly but no pipes or actuator and rod. Is it a solenoid? So I need the other parts please. See below.
The whole of the AIS assembly has been removed including the pipework so could I have the complete assembly please?
I seem to have all the parts of the EXUP - just need to make sure it is installed correctly!
If you can delay posting until next Saturday or the following Monday that would be great and, hopefully, delivery would coincide with our return from Spain (where hopefully we will see some sun)!
I am really grateful for your efforts - thank you very much indeed
I'll hold off for a week in regards to posting for you buddy. Look forward to help where i can upon your return should you need it.
Most importantly, enjoy your rare break away. Having just got back from Spain myself, i can gladly say that the sun shone and it was blue skies every single day. Hope my good luck rubs of for you.
A pleasure Brian. Glad that the parts will actually get used.
Good luck with the install. Just shout if you get stuck in any way.
V. chilly here, but thanks for bringing back a little sunshine with you at the very least Going to hit the trails tomorrow and it looks to be a bright one.
Wow - was it really that long ago that I got the parts
Only just got around to fitting them.
Started with the air box flapper but it didn't take long for me to have to retreat to the PC to watch the video again to remind myself what goes where!
Airbox flapper installed but, looking at an earlier photo, I have wrongly routed the lower tube and it needs to be fed underneath that section of the loom
I think I have got the pipe that fits on the injector body routed correctly but can't find any photos to compare.
Routing the large long pipe for the AIS proved problematical. It seems to sit OK but until I can check another WR250R I am not sure.
The next photo is the bad news. Despite trying the "tighten first and then loosen" method both AIS bolts sheared so that's going to be a fun repair job - not
Unfortunately i don't remember the exact routing for the pipe work, but I'm sure a couple of photographs from a totally stock WR will have you quickly back on track. Maybe Steve could help you out here. I'll have a word when we meet up this coming Saturday.
Very frustrating for you in regards to the sheared bolts . I've been there myself before so you're most certainly not the only one to be kicking yourself. I'm sure that a drill out and re tap can be easily done, but I'm not going to lie, I did push such job out to a seasoned pro.
No worries Paul - I have an excuse to pop out and see a mate who lives fairly near and now has a WR250R with all the gubbins still fitted
So, I was lucky with the sheared bolts in that I was able to Helicoil the bottom one easily enough and the remains of the top stud screwed out
So the AIS is now fitted.
I re-routed the flapper tube and found a clip waiting to accept the pipe so am pretty confident I got that right this time.
I put everything back together and popped up to the garage for a pasty and test ride. The WRR seemed to pull more cleanly from cold but, other than that, I confess to not noticing any difference whatsoever.
Either the controls don't do anything much or they aren't working (which is entirely possible).
I had an engine management light on before I started work but can't recall now what I decoded it as but it was something to do with the emissions kit.
I am a bit out of my depth on this now so, after checking that I have routed and fitted everything properly (by comparing with my mate's bike) I am tempted to throw some money at it and get our local Yamaha dealer (Bridge Garage) run the diagnostics and tell me if everything is working as it should.
Absolutely amazing! Kudos to you Brian. Extremely speedy work, congratulations on your hard work. A little tune up by Yamaha I'm sure will be money well spent. Funnily enough a helicoil was exactly what I used on my last mishap...smiles.


 . I'm certain i have everything you need anyway.