I'm going to kick off a new topic on cheap and sometimes even free mods .
They can be useful or simply just for aesthetics. In fact just about anything goes, as long as you feel that what you have done either improves the bike or rider, and that whatever materials might be needed, can be easily and cheaply found .
I'll get things rolling with a few of my own below. Over the weeks i'll add some more and hope that maybe you'll throw in a few of your own when you drop by too
Having previously been a rescue diver, i'm all about prevention rather than cure. Hence my favourite mods are about protecting things before they go bust!
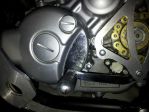
The left side casing always looked prone to damage from the gear shifter. Should the bike go down on rocks, the shifter could get bent inwards and potentially crack the casing. Yamaha felt it fit to put a lovely plastic cover over the right side of the clutch case (it'll do the job), so why not the left side?
When removing the gear shifter to raise it a little for my bulky Tech 3's to fit under a bit better (raising the shifter a notch works wonders for a more comfortable gear change ) i also found that the front inside edge of the shifter, right at the point where it would impact on the engine should it get bent in, is extremely sharp, adding to the potential nightmare. I mean really , imagine cracking open your case on the trail...there'd be tears
So first things first, take a dremel, file or grinder and round off that front inside leading edge of your stock gear shifter.
Next, to make a small plate and protect that little area upon the casing....
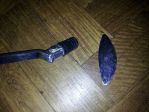
Make a template out of card copying the little indentation shape. Then use this template to mark out a protection plate from a sheet of something like stainless steel. Having nothing laying around, I swung by my local pound shop and picked up a kitchen cake slice for yep you got it...£1. Perfect. A surprisingly thick, ridged piece of metal.
Then ideally using a dremel (a 4" grinder might be possible if carefull, followed by lots of filing down), cut out the plate and grind/ file the edges smooth. Keep offering the plate up at this point to make sure of a good fit.
Once you're happy, use RTV sealant to stick the little £1 gem into place and job done . Use masking tape to hold it in place if needs be for 24 hrs.
RTV is great as it will take high temperatures from the engine. Being a sort of rubbery, silicone type of product, should there be any impact, it would also flex and cushion a little too.
A great addition to the Sandman jewlery i think and much peace of mind. I love it when i can address an area without a silly price tag.
Never a favourite when your best buddy decides to tear off in front of you showering everything in thick mud. Even worse when there are a few loose stones in the mix and your headlight takes a crack
I'm sure there are many headlight guards available. All probably far to bulky, over the top and expensive for a light that was never that great in the first place. Worry no more...
Using a sheet of 3mm perspex acrylic/ plexiglass in obviously clear/ transparent, cut out a rectangle that is 130mm x 85mm. Make sure that the sheet you use is UV protected to prevent yellowing.
Round off the corners to screen with a dremel/ file.
Using industrial strength velcro, cut 4 small squares out to stick in the corners of the screen and then the headlight. Industrial strength velcro will hold upto 7kgs and is ideal outside in wet conditions. Perfect for WR abuse. The velcro will also keep the screen just ever so slightly off of the headlight glass. Good if the light were a little warm and also if there was any impact, a little flex. Being mounted on velcro is also handy at times like when washing as it makes the screen detachable.
Wipe the headlight and the screen with an alcohol wipe. Affix in place...job done.
I recommend "Trent Plastics" found on ebay for the perspex itself. They sell it cheap in A4 sheets which is enough to make 4 screens. Being that they then offer a free cutting service, the lazy man just couldn't say no .
Having my screen, a spare and one for a buddy, i have one left. If the first member interested in these wants to PM me their postal address (within the EU), i'll drop my fourth made up screen over to them totally free! You can't get a mod better than that!
Rip and run little rooster.
Overall time spent: 5 Mins - if you've tricked someone else into doing the cutting already
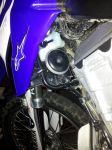
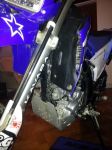
So the stock horn position always looked a little goofy to me . Other than looking pretty snide it was hanging out there swinging in the wind just waiting to get caught up and snatched on something.
Problem sorted if you are one of those that has removed your AIS (if not, why on earth not). Having removed the AIS, you'll find that there is a convenient hole left behind that is perfect for tucking the horn up into...
Simply release the bracket and horn. Then flip the bracket upside down and if i remember correctly i think back to front, with a little fiddling it will fit. You'll find bending the bracket back ever so slightly will also help.
You'll now have a much cleaner look and no risk of riping off your horn. Initially i was concerned as to if it would impair the volume. One quick blast said to me no problem .
...ha ha. No, just lazy when there's power available. I should say mini grinder i suppose. Love the tool. Makes life so simple quick and easy. My main tools of choice at work would be a hammer and grip fill. Solves most problems A 4" grinder for good measure. Then some neat tidy plastering and painting skills to cover all the sins
I see your point to an extent on the mods not being so specific to the WRR. I'll bare that in mind with future posts and leave out some of the simple universal ideas such as triming down the clutch lever to a 2/3 finger pull, as it could apply to any bike indeed...found that one extremely useful when changing gear and hanging on to the bars for dear life off road though i must say
I'll bear that in mind with future posts and leave out some of the simple universal ideas such as trimming down the clutch lever to a 2/3 finger pull, as it could apply to any bike indeed...found that one extremely useful when changing gear and hanging on to the bars for dear life off road though i must say
An excellent thread already - many thanks!
I am sure that quite a few WRR/X owners have a skeleton in their garage (I have a few non-WRRs myself!) so all ideas are welcome both specific and general!
I agree with Brian. My comment wasn't meant as negative. Even if they're not WRR specific, they're still definitely worth posting up.
Talking of shortening levers, my bike failed an MoT once because the shortened lever didn't have the little ball shape on the end. Apparently it's there to stop your fingers sliding off. So my solution was a "cut and shut" job, taking about 3/4" out of the middle then drilling and tapping a threaded piece in to screw the two bits back together again. A lot harder to do it than write about it!
-- Edited by SteveT on Saturday 17th of January 2015 03:58:05 PM
...Ah. That's very kind of you both to say. When guys with such passion, dedication and experience as yourselves, one can only take comments made as positive I value your opinions. You're both extremely helpful and i'm ever gratetful.
Where else other than on a forum as knowledgeable and sharp as this could we hear of such amazing ingenuity as your clutch lever ball efforts Steve... I take my hat off to you and can't begin to imagine what a headache that must have been to accomplish...well done to you sir. Thanks for the MOT heads up too, i honestly didn't know that. I'd have still cut it off, but it will prompt me to get the spare lever i was intending on having for the trail a bit sooner. Will then just swap it out come test time, or if / when there should be a breakage on the trail
I take a more amateur approach to repairing a broken lever
I cut any remains of the lever off the ball end, drill an 8mm (or larger) hole in the ball, grind the other end of the broken lever a pin that is a reasonably tight fit into the hole, and then stick the ball on the pin with a gob of Araldite (any epoxy resin will do) which also means no sharp edges to catch or tear gloves
Makes me wonder why companies make them so long in the first place when we all quiite clearly prefer a shorter 2/ 3 finger pull. Probably some sort of safety nonsense written by a guy who's never even ridden a bike .
It seems clutch levers are destined to be either cut down, or simply replaced for something shorter.

 .
. .
. 


 . Other than looking pretty snide it was hanging out there swinging in the wind just waiting to get caught up and snatched on something.


 I take my hat off to you and can't begin to imagine what a headache that must have been to accomplish...well done to you sir. Thanks for the MOT heads up too, i honestly didn't know that. I'd have still cut it off, but it will prompt me to get the spare lever i was intending on having for the trail a bit sooner. Will then just swap it out come test time, or if / when there should be a breakage on the trail

 Clutch levers...everyone's at it.


